
Resin Casting

Vertical Blank casting
Author Last Post

Adding a quick note - there are 2 casting videos in our Video Library - one from 2019 staring Barry Gross who gave a basic intro to casting at one of our meetings. The second one is my video from 2020 recorded in my shop during Covid that goes over all the casting basics as well. I'm going to rewatch it and see if a newer updated video would be of use.


Kevin


Setting the stage - I only pour pen blanks. I do it vertically in 3/4 " molds that are 8.5" long in a pressure pot except for some of the hybrid blanks I am working on. I know others in the club cast lots of other items - Jesse has made some cool stuff - so my info is very specific to a process, but can be adapted to other types of casting.


I use three different resins, depending on what I am doing. My normal go-to is Alumilite Clear Slow, used for most of my pen castings that will be colored. It has a nice working time, turns well and is very friendly to mica and non-water based dies. It's downside is it is sensitive to UV light, so the resin slowly yellows - again the reason why I color it.


When I am pouring totally clear items that I need to stay crystal clear, I use Liquid Diamonds resin - an epoxy resin vs Alumilite Clear Slow which is a urethane resin. Liquid Diamonds, like all epoxy resins, has a really long open time and is very slow to cure. The resin is pretty picky for holding mica, as the long set time allows the mica to settle out before the resin hardens. It does take well to resin dyes however, as they blend and hold their color.


I am now testing a new resin from McKenzie Penworks which is also a urethane resin, but it has very low tolerance for moisture requiring me to dry the air going into the pressure pot when casting. McKenzie uses this resin as their resin of choice for their DiamondCast blanks. It is very UV stable, but will yellow with extended exposure just much slower than Alumilite products, has a good open time, and is compatible with most non-water based dies.


I use two pressure pots and almost exclusively cast vertically in either silicone molds or PVC pipe molds. The Alumilite Clear Slow and the McKenzie Urethane require pressure while the Liquid Diamonds does not. My pressure pot of choice is anything made by California Air Tools - really good quality, but a bit expensive. A good Harbor Freight conversion which one of my pots is, can be great or not so great, due to variations in their manufacturing.


If you have time, watch the resin casting video I did about 3 years ago - it covers the basics and can be found in the website video files. I also suggest if you want to learn more try watching Zack Higgins on YouTube - Resin Werks Studio - he makes a lot of things mostly focused on pen blanks, but his working process is good for lots of stuff.

I use Alumilite Clear Slow which does require a pressure pot. The one I have is a converted harbor freight but am just waiting to pull the trigger on a California Air tools pot. I am pretty sure that is what Chris and others have been using lately. 


As for molds, a lot of times I am at the dollar store getting “Tupperware” and are one and done or I save cottage cheese containers. I do have a round silicone pie mold in the bottom of my pot in case of leaks. Finally Ptownsubbie.com has some good molds I have purchased.


This is what I wrote. Not sure why it didn’t go


Sent from my iPhone


We took a resin class this weekend and really enjoyed it.


What brands of resin casting do you use?

Is it measured by weight or volume?

Where do you purchase your resin from?

Do you have molds and what kind and where did you purchase them from?

What pressure pot do you use?


Any tips, tricks for anyone just getting into resin pouring?

Thanks in advance.

From what I have been told, the centrifuge tubes are super smooth inside to keep any damage from occurring to the specimens when used for what they are intended for. I'm hoping that transmits to easily removing the castings. I figure worst comes to worst; I just turn the tube off on the lathe if things get stuck.


To answer the question of Stoner mold release or not, the first batch is going into the pressure pot tonight. I'm doing a few tubes without the release spray and some with. I'll let you know how this goes.


I do want to clarify one item however from everyone's comments. Alumilite Clear Slow is sold and mixed by weight, not volume. The test tubes are labeled for volume. If you mix equal volume parts of Alumilite part A and part B, your casting will most likely fail, as the resin components are different weights. You must use equal weight of A and B, but you need to calculate the volume needed to fill the tubes. I use rice to help me determine volume then transfer my volume measurements to get the correct weight. I wouldn't use water to do the measurement, as water and Alumilite don't get along - you will end up with a pot full of foam if even a trace of water is in the molds.


I will let you know regarding the mold release once things come out of the pot.


Great idea to use centifuge tubes. I used to use 3/4 inch pvc pipe to save resin as well. Gotta be careful though. Even when spraying with Stoner, after a few uses I had trouble getting release. The centrifuge tubes probably won't have the same problem. The rack is a really nice addition.

I’ve used pvc pipe as a casting mold, but had to spray the inside down with Stoner Mold Release so the cured resin pops out easily.  Do you use any type of mold release with the tubes you show in the photo? 


Very nice job on the rack.  Also I just did the math and you use 21.7% less resin when you are using a ¾ inch round tube v a ¾ inch square mold.  So roughly, for every 5 round ones you make your 6th is free v using a square mold.  If you increase the diameter of the tube to .85 the volume is roughly the same as ¾ inches square, but now you have a broader and much easier to turn blank.


Bill Stewart


The tubes are a nice find.  Did the resin come out easily and did you use mold release? 

I like the holder.  

 I have not been successful with PVC but was inexperienced at the time.  

Not for pens but for other items I have been using round forms like seltzer bottles or cottage cheese containers for the same reason.  Expensive waste just to turn it to round.  

Jesse

Sent from my iPhone

I have been casting Alumilite Clear Slow resin blanks in a rectangular block mold I made from HDPE plastic for a while. The block mold allows me to get 3 to 4 pen blanks out of each poured casting, which is pretty decent. However, the resin is getting really expensive lately and I've been trying to think of ways to reduce the volume of resin I need with each casting to control my costs. Since the block pours come out square, I waste a lot of the material (and time) making the blank round and to the right length.


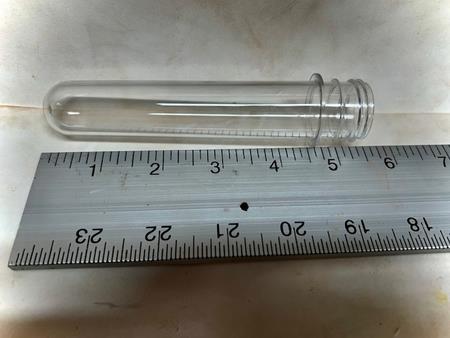
One method I read about was vertical casting using different items for the vertical mold. One method described using PVC pipe with a cap on one end as a mold. Some reports said this was very successful and others only stated reasonable success. Another method I read about was using centrifuge test tubes as the molds, as they are super smooth inside and reusable plastic. I found 50 ml tubes with a length of about 5.5" and a diameter of .85 inches which seemed perfect. Cost was super cheap - 50 tubes for about $15 delivered to my door. Waste is minimal, because the tubes are close to the 3/4" diameters I typically use for pens and the length allows me to get a full pen blank out of it for most pen sizes. However, have you ever tried to keep a tube perfectly vertical, so nothing spills out? Forget about it.


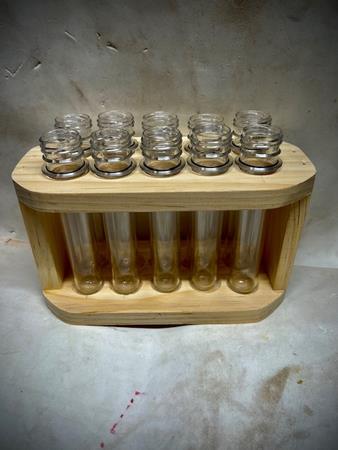
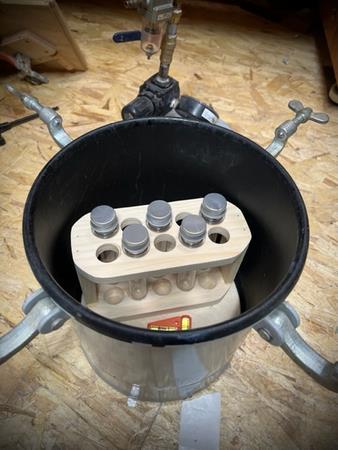
My answer was a tube rack for my pressure pot. Racks on Amazon are a lot of different costs, but I needed something that was a somewhat high density that also fit in the tight space inside the pressure pot. Off to my scrap pile!


I put together a wood rack from 1x6x 3/4 pine that holds 10 tubes and fits into my pressure pot perfectly. I could have changed the shape slightly and even increased the tube density to close to double, but I don't pour that many pieces at once (yet!).


It took no time to construct and it works! Pics are below if you need something similar - just figure the dimensions to fit your tubes diameter and height and you are good to go!


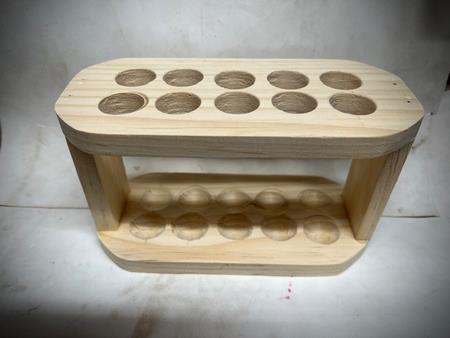
To build it, I cut the pine down to a length to fit my pot. I then drilled 10 holes in the top that were slightly larger than my tubes. I drilled them with a Forstner bit with a pilot point which allowed my to index into the bottom panel. I then used a round router bit to bore out curved dimples in the bottom panel that matched the upper panel holes perfectly. A little glue and air nails were used to connect two vertical riser pieces to attach the bottom and top panels together. A quick run on my belt sander to smooth down everything was done before assembly and then again to do the rounding on the corners to help the whole assembly fit better in the pot. Basic 'jig' construction - nothing fancy or hard to do.


From my calculations, the square block mold used about 300 ml's of resin and I got 4 blanks out of it. With the vertical rack, each tube pour is about 50ml's, so 4 pours would be 200 ml's or a savings of 100ml's of resin with each casting, or roughly a 25% savings of materials! Not bad!


The tubes are reusable, as is the rack, so my fixed costs should only be my resin cost. All in all a good return on another fun project!


Kevin


Return to Forum